

How to sync notes using version control across mobile devices and desktop operating systems using Obsidian + Git + Termux


this is an ultimate guide to setup synchronization with version control implemented across devices for your notes and written materials in general.
Why i love Obsidian:
full Markdown support
excellent plugins (thanks Obsidian community :)
portability
customizations (e.g. css scripting)
Prerequisites:
• familiar with terminal-based interactions
• a github personal access token (only for private repo)
• a nerd with passion for computer tech
Let's begin.
Obsidian
graphical interface instructions
Android & iOS
install Obsidian via Play Store or App Store, open it and turn on "Community plugins" in the app's settings, browse community plugins to find and install Obsidian Git by denolehov and enable it, now we have git tasks available in command palette.
Go to settings > obsidian git (under community plugins section) you now will see "Git is not ready" because there's no repo specified in "advanced" section.
Setup
- Select hamburger menu at bottom right corner of the screen > open command palette and type "Git: Clone an existing remote repo"

\> "github.com/ChristianLempa/cheat-sheets"

\> type "cheat-sheets" and enter (to create folder)

\> press enter again (full depth cloning)

we use this cheat-sheets public repo by Christian Lempa as an example because it's a lightweight repo so this process should finish in less than a minute.
restart Obsidian > settings > (Obsidian) Git > advanced, you will see there's now "cheat-sheets" under "custom base path" because Obsidian has automatically inputted it after we cloned the repo.
- in Git settings, scroll to "commit message" section, edit commit message to "vault backup: {{date}} on {{hostname}}" and placeholder replacement to your device's name, mine is "Google Pixel 7 Pro"
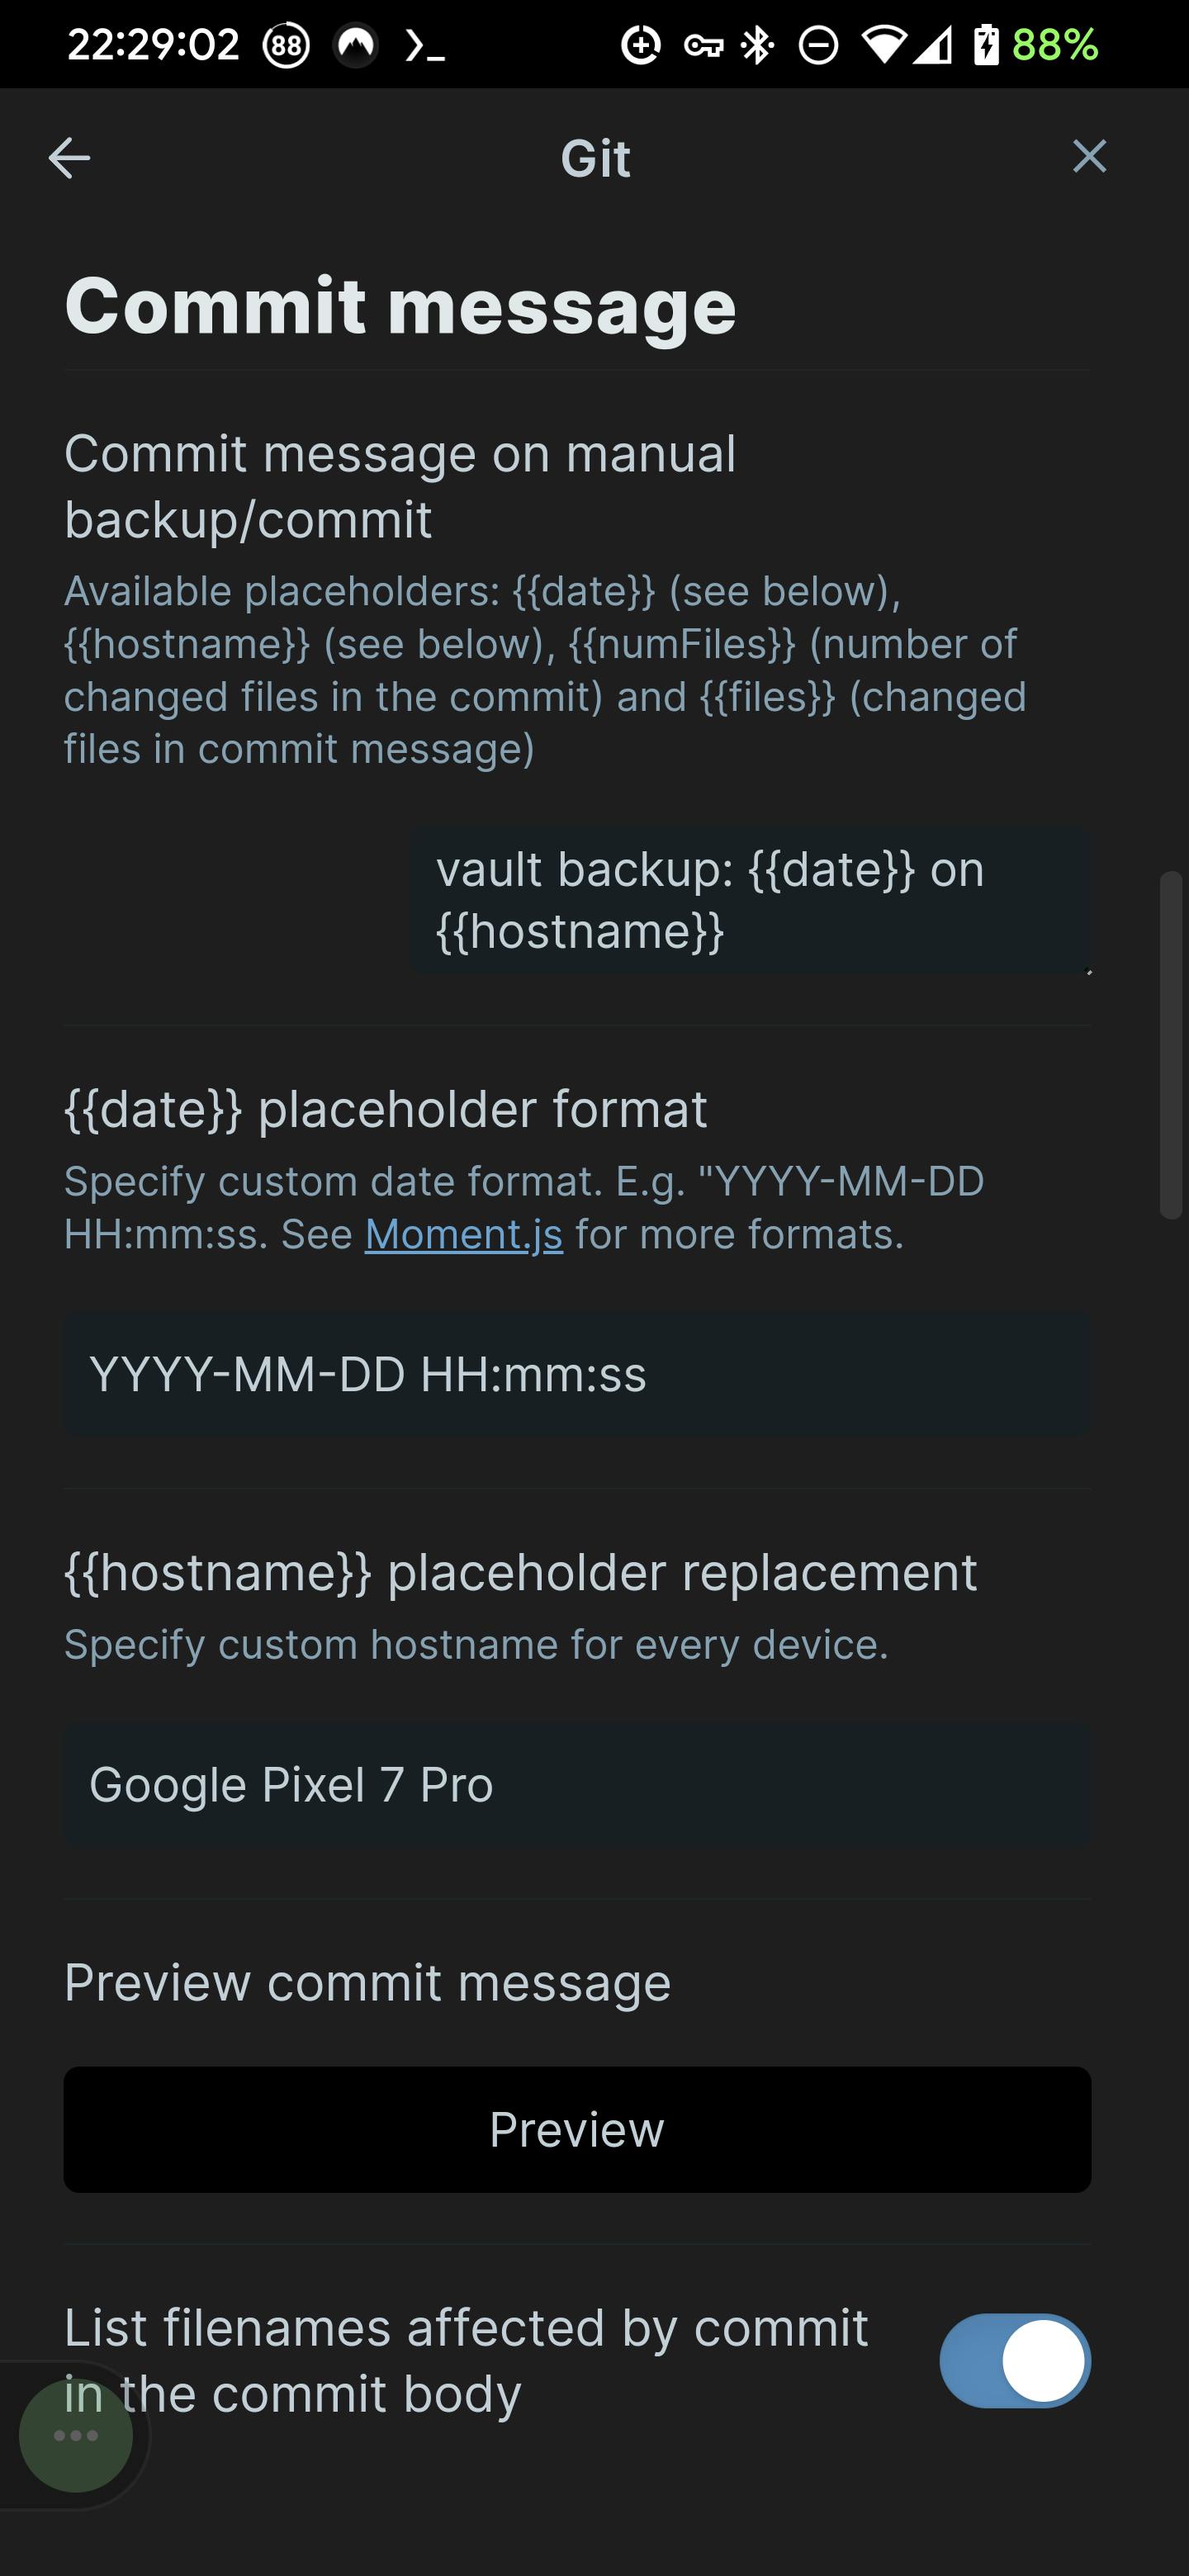
from now on every commit you make and push from Obsidian will appear on Github history in the format you defined with each commit differ in the time it is made, like this:

here's how it looks in desktop interface:

with obsidian ui elements hidden:

and in github desktop:

Linux & Windows & MacOS
Install Obsidian and set it up the same as on Android and iOS.
Prelude
inside an Obsidian vault/folder always exist a hidden folder .obsidian to store configuration files, we have 2 ways to do this:
open each repo as its own vault
use a folder (e.g. src) as vault base for repos
option 1 is suitable when you mainly work with 1 repo, but this will create .obsidian folder in each repo you open as vault;
option 2 is suitable when you want to manage multiple repos within a vault, one .obsidian folder for all repos;
depends on your use cases, both options can make sense whether you choose to implement it on mobile or desktop environment;
personally i choose option 2 on mobile and option 1 on desktop because the .obsidian configurations i chose to sync to github is for desktop, plus desktop environment already has powerful text editors like vscode and github desktop so it will be redundant to also open it in obsidian imo, github desktop is way more intuitive than obsidian in terms of version control management.
Setup
select "open folder as vault" and choose your folder, this will create .obsidian folder inside your folder (if not exist already)

find and install Git community plugin, enable it
fun fact: the plugin name used to be "Obsidian Git"

we now have git tasks in command palette, exit settings and press Ctrl + P to open command palette > type "Git: Clone an existing repo" > "https://github.com/ChristianLempa/cheat-sheets" > type "cheat-sheets" and enter > enter (full depth cloning)
PAT (personal access token)
to clone private repos, configure authentication using PAT (personal access token) via Github and Obsidian Git settings
Github
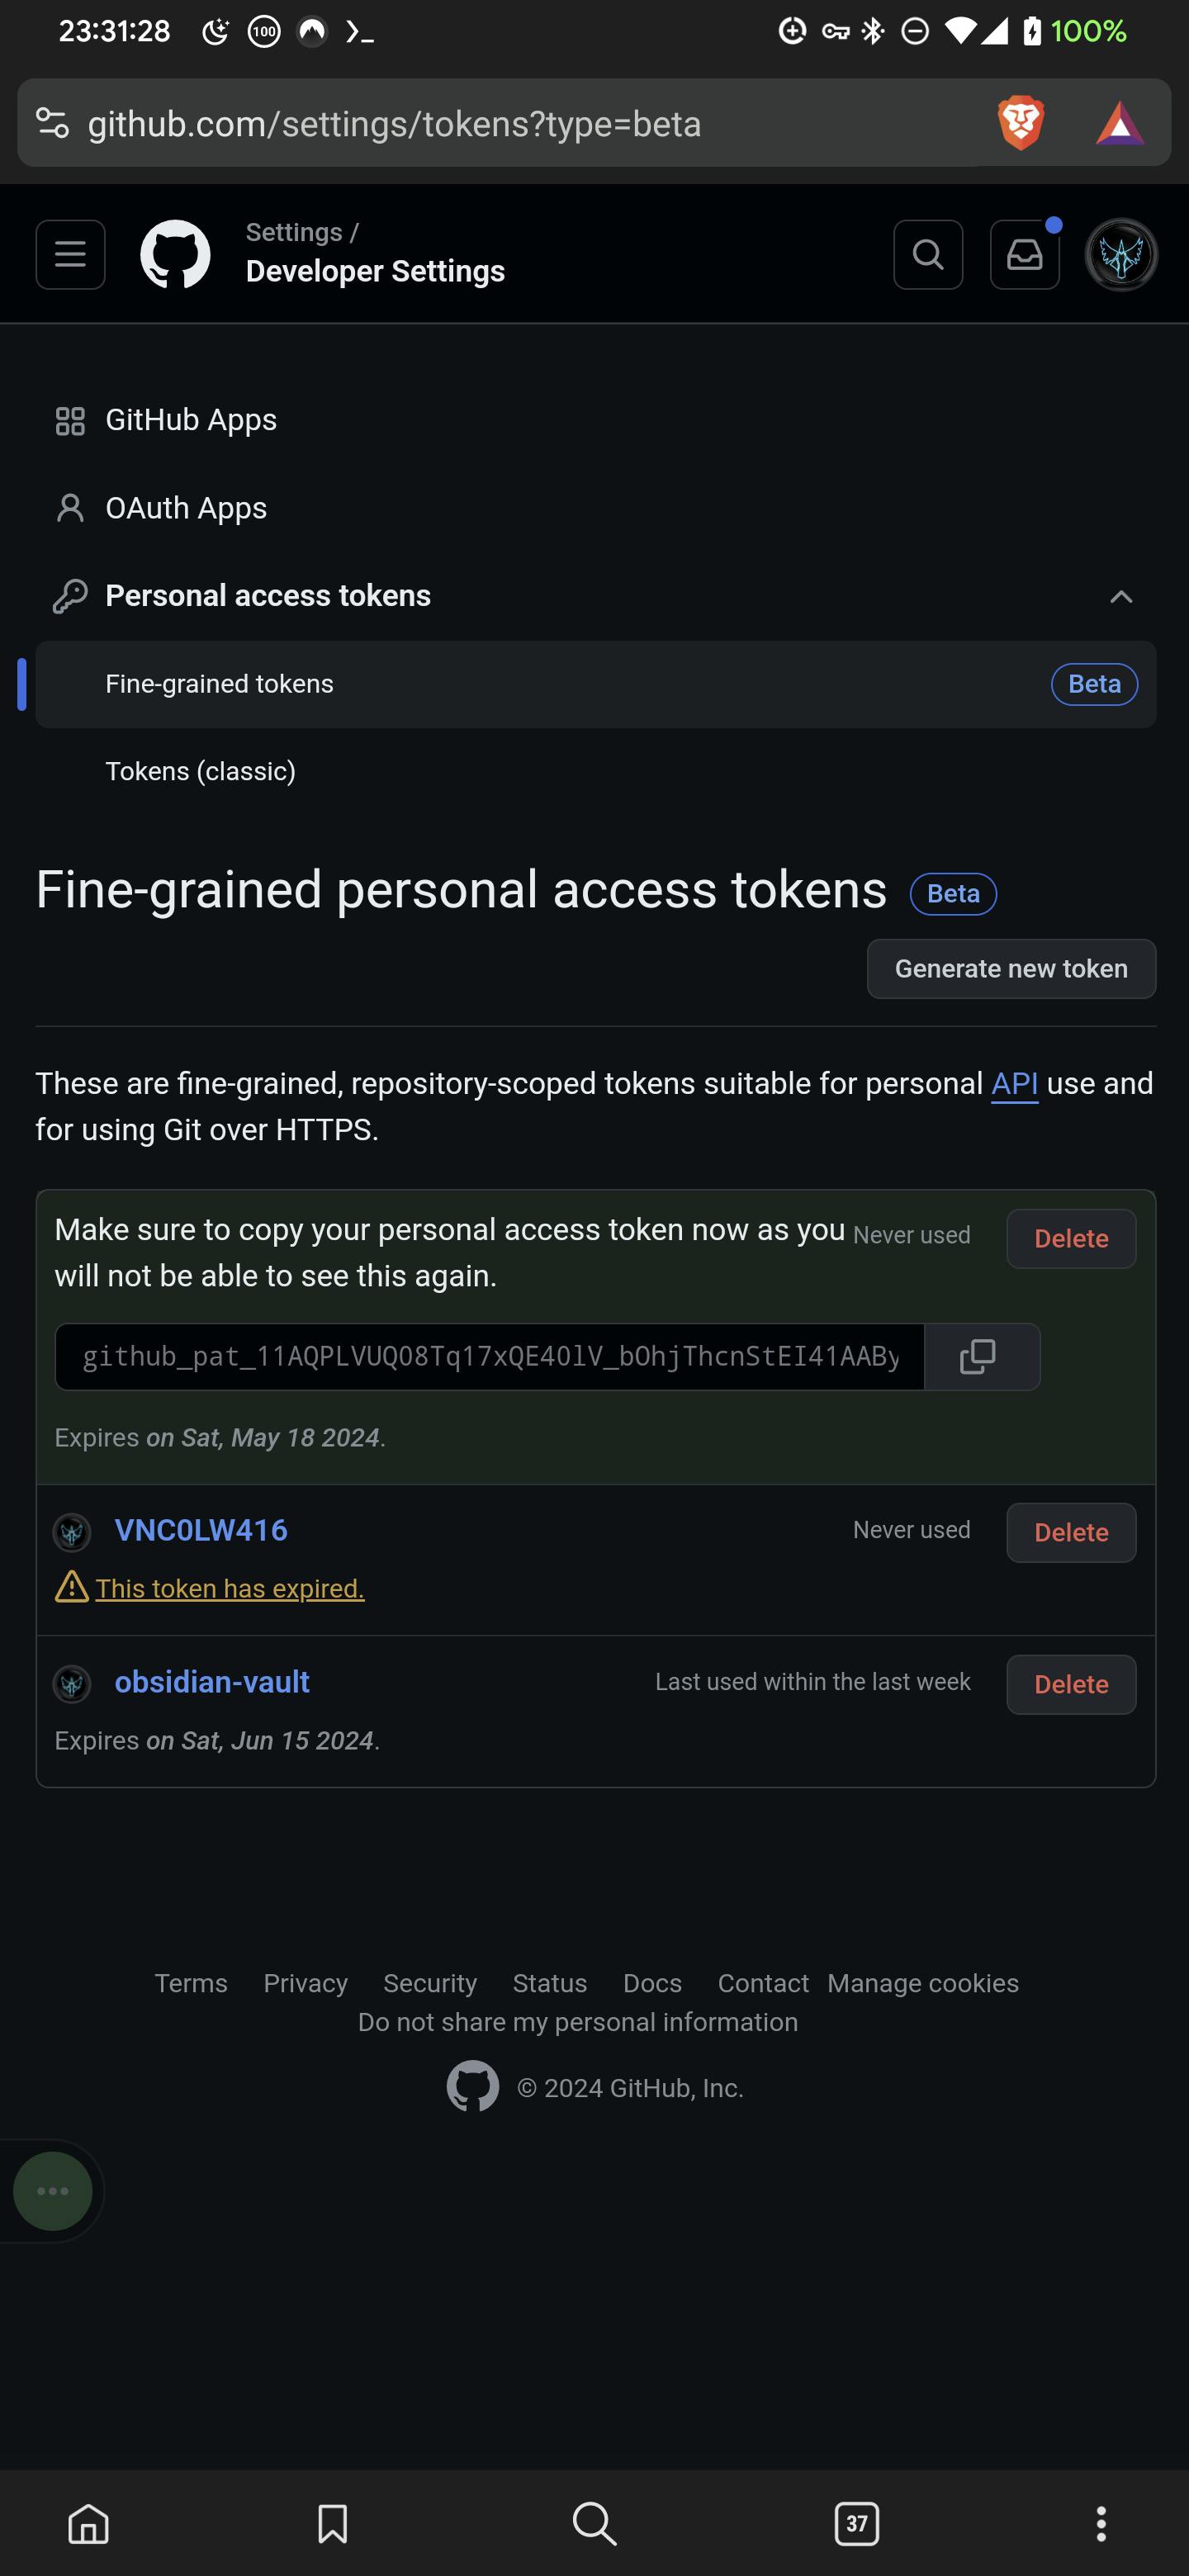
https://github.com/settings/profile > developer settings > personal access tokens > fine-grained tokens > generate new token
\> input token name and expiration
\> under "repository access" select "only select repositories" and choose your private repo(s)
\> under "permissions", "repository permissions" max out all items to "read and write" access level
\> under "account permissions", "email addresses" select "read-only"

\> generate token
\> copy your private token and save it in a secret place, github won't show it a second time, try refresh page you'll see
PAT is both convenient and easily disposable making it a fine(-grained) way to quickly authenticate and authorize limited-time-and-scope access to specific data instead of exposing the entire private resource.
Obsidian
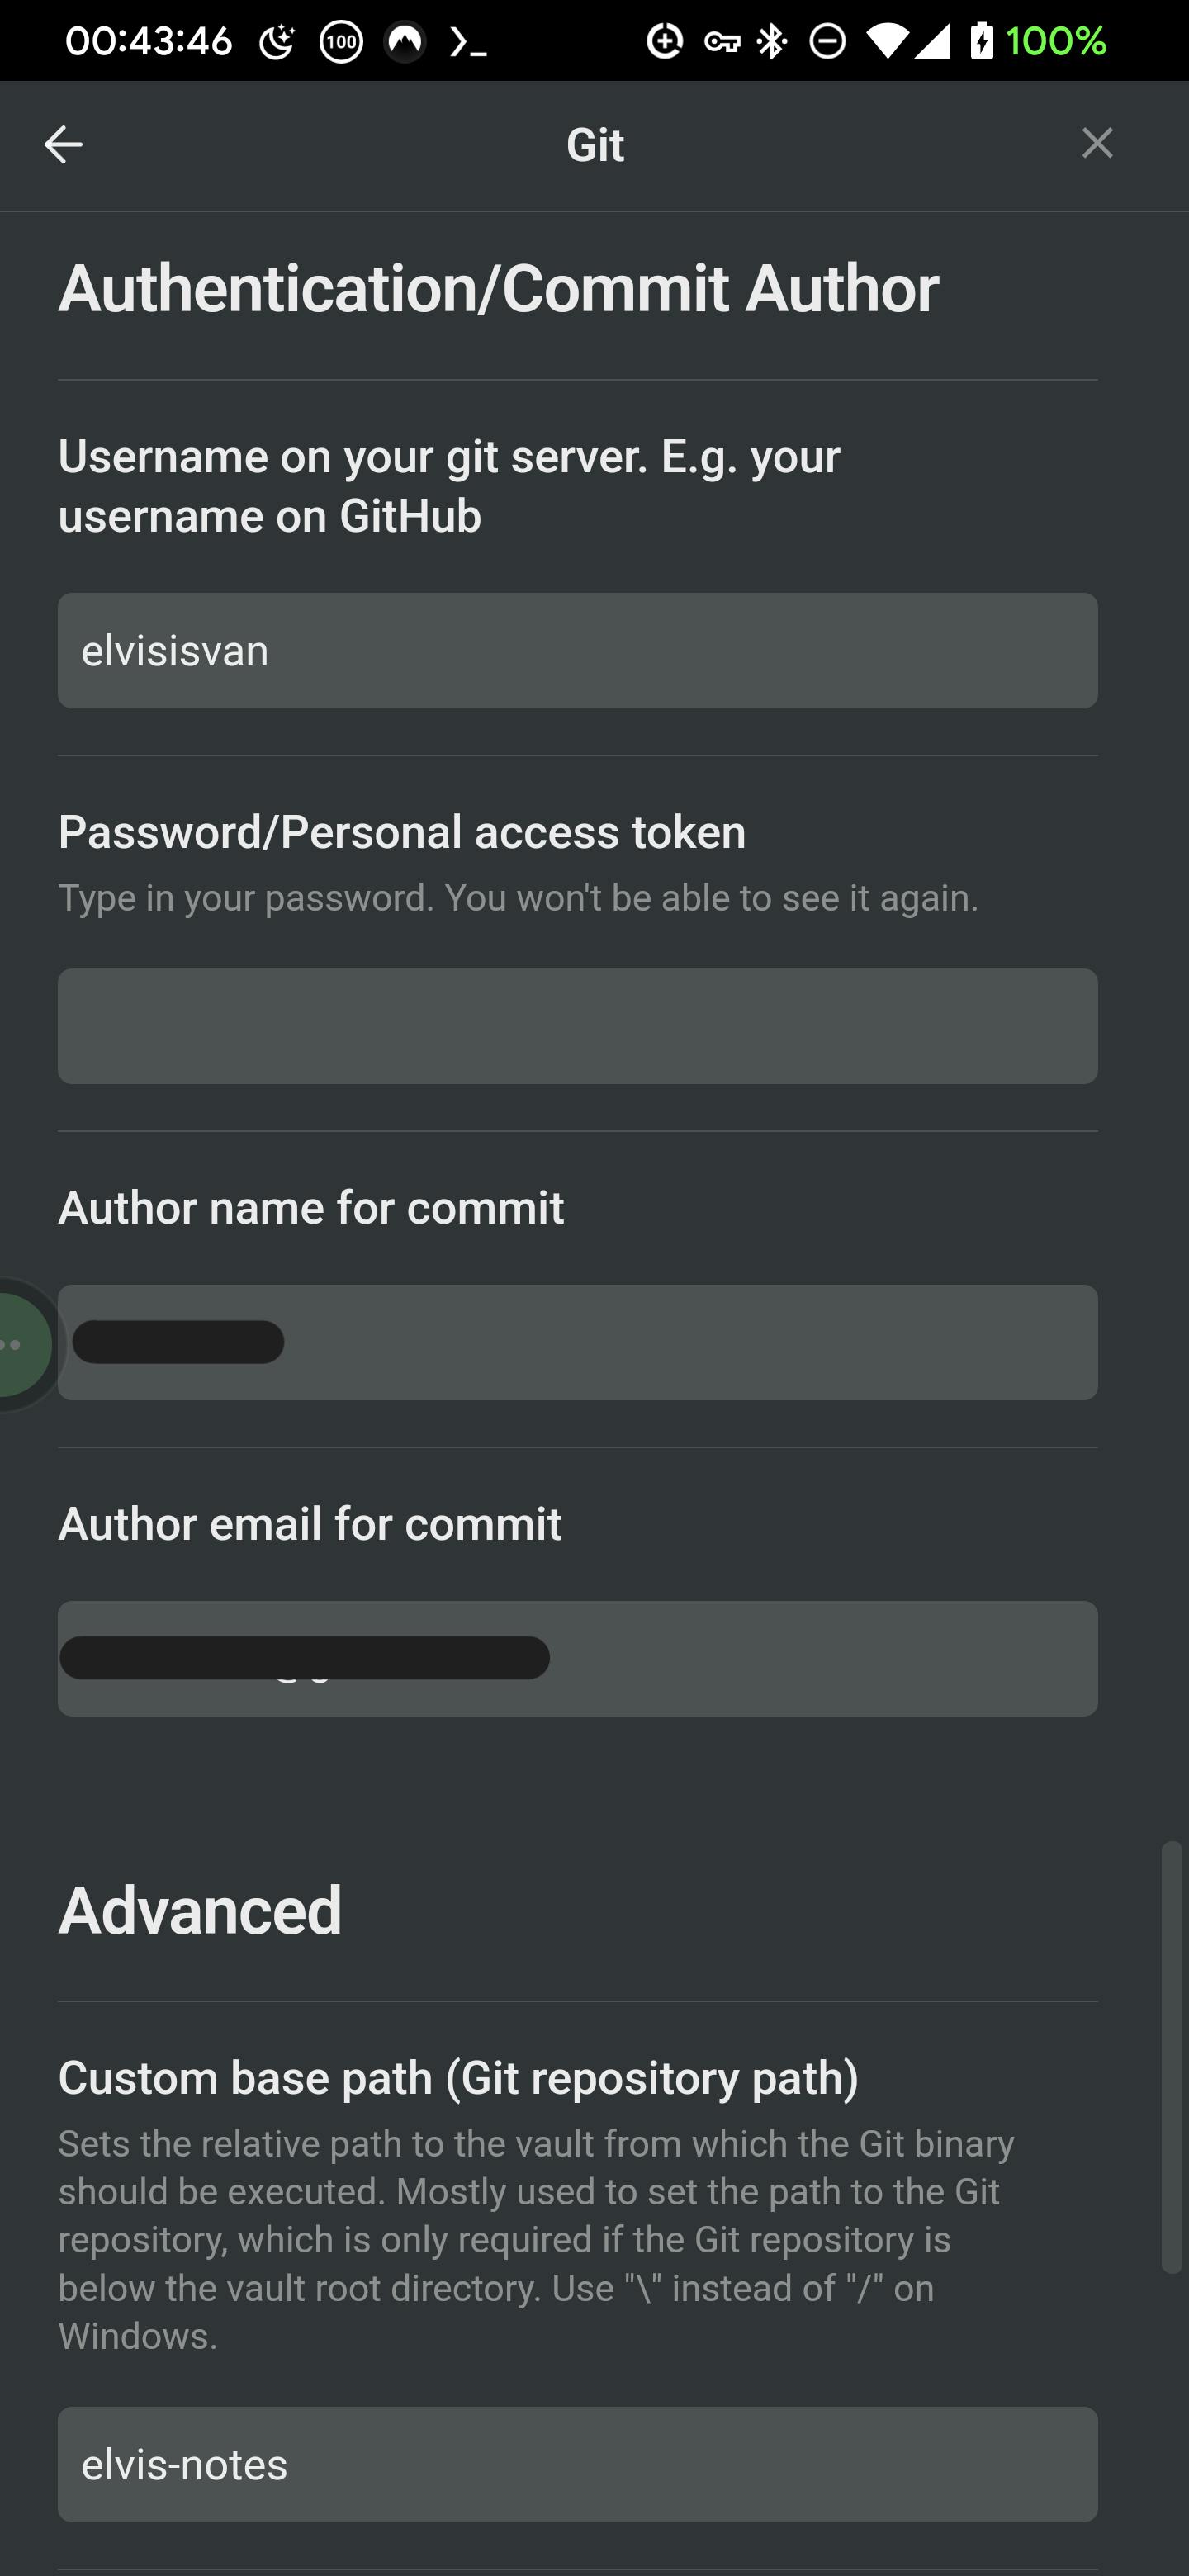
open obsidian settings > git > "authentication/commit author" > input your github username > "password/personal access token" > input your pat
just like github, obsidian won't display your pat the second time, so no need to worry if you don't see it later
scroll to Git section to read more about how to use pat in termux
Termux (Android-only)
While setting up Obsidian vault with version control solely within the Obsidian app is straightforward and easier, through experience i found doing it via Termux using git command is the least error-prone method, especially for big size repos, plus we'll have full manual control of the repos.
install termux from the project's official website: termux.dev
- Open Termux, run this command:
pkg update && pkg upgrade -y
(fetch and refresh local cache with the latest packages and upgrade them to their latest versions)
- Next, setup storage access:
termux-setup-storage
grant access in the pop-up dialog appear after entering the command. This will create a folder named "storage" contains symbolic links pointing to common directories (documents, downloads, videos, etc.) in android user's default directory - which absolute path is /storage/emulated/0
(run ls ~/storage/shared to view what's inside /storage/emulated/0 , it will display the same stuffs like when we open internal storage in a file explorer)
- Next create a folder to store git repos:
mkdir ~/storage/shared/src
# navigate into src
cd ~/storage/shared/src
Git
command line interface (CLI) instructions
Android
open Termux, and run these commands
- Install git:
pkg install gh git
- for public repos we will use Christian Lempa's cheat-sheets repo as an example for this command:
git clone https://github.com/ChristianLempa/cheat-sheets.git
cd cheat-sheets
for private repos:
gh auth login
"Github.com" > "HTTPS" > "Paste an authentication token" > paste your PAT and press enter


btw, the config for that intuitive bash prompt is this:
PS1="\[\e[0;31m\]\n\342\224\214\342\224\200\$([[ \$? != 0 ]] && echo \"[\[\e[0;33m\]\342\234\227\[\e[0;31m\]]\342\224\200\")[$(if [[ ${EUID} == 0 ]]; then echo '\[\e[01;31m\]root\[\e[30m\]@\[\e[01;96m\]\h'; else echo '\[\e[01;34m\]\u\[\e[30m\]@\[\e[01;96m\]\h'; fi)\[\e[0;31m\]]\342\224\200\t\342\224\200[\[\e[0;32m\]\w\[\e[0;31m\]]\n\[\e[0;31m\]\342\224\224\342\224\200\342\224\200\342\225\274 \[\e[0m\]\[\e[01;33m\]\$\[\e[0m\] "
you're welcome :)
- since we've already authenticated yourselves, now we can clone the private repo that our pat has access to:
gh repo clone <username>/<repo-name>
or:
git clone --depth=1 <link-to-repo>.git
the --depth=1 flag tells git to only clone to the latest commit, we'll have all the latest content but with significantly reduce clone size, especially for large repos with years of commit history;
both commands can clone a repo but only git has advanced options like clone depth or into specific branch a.k.a the stuff of repo management while gh is more focused on account management, hence gh auth command for authentication
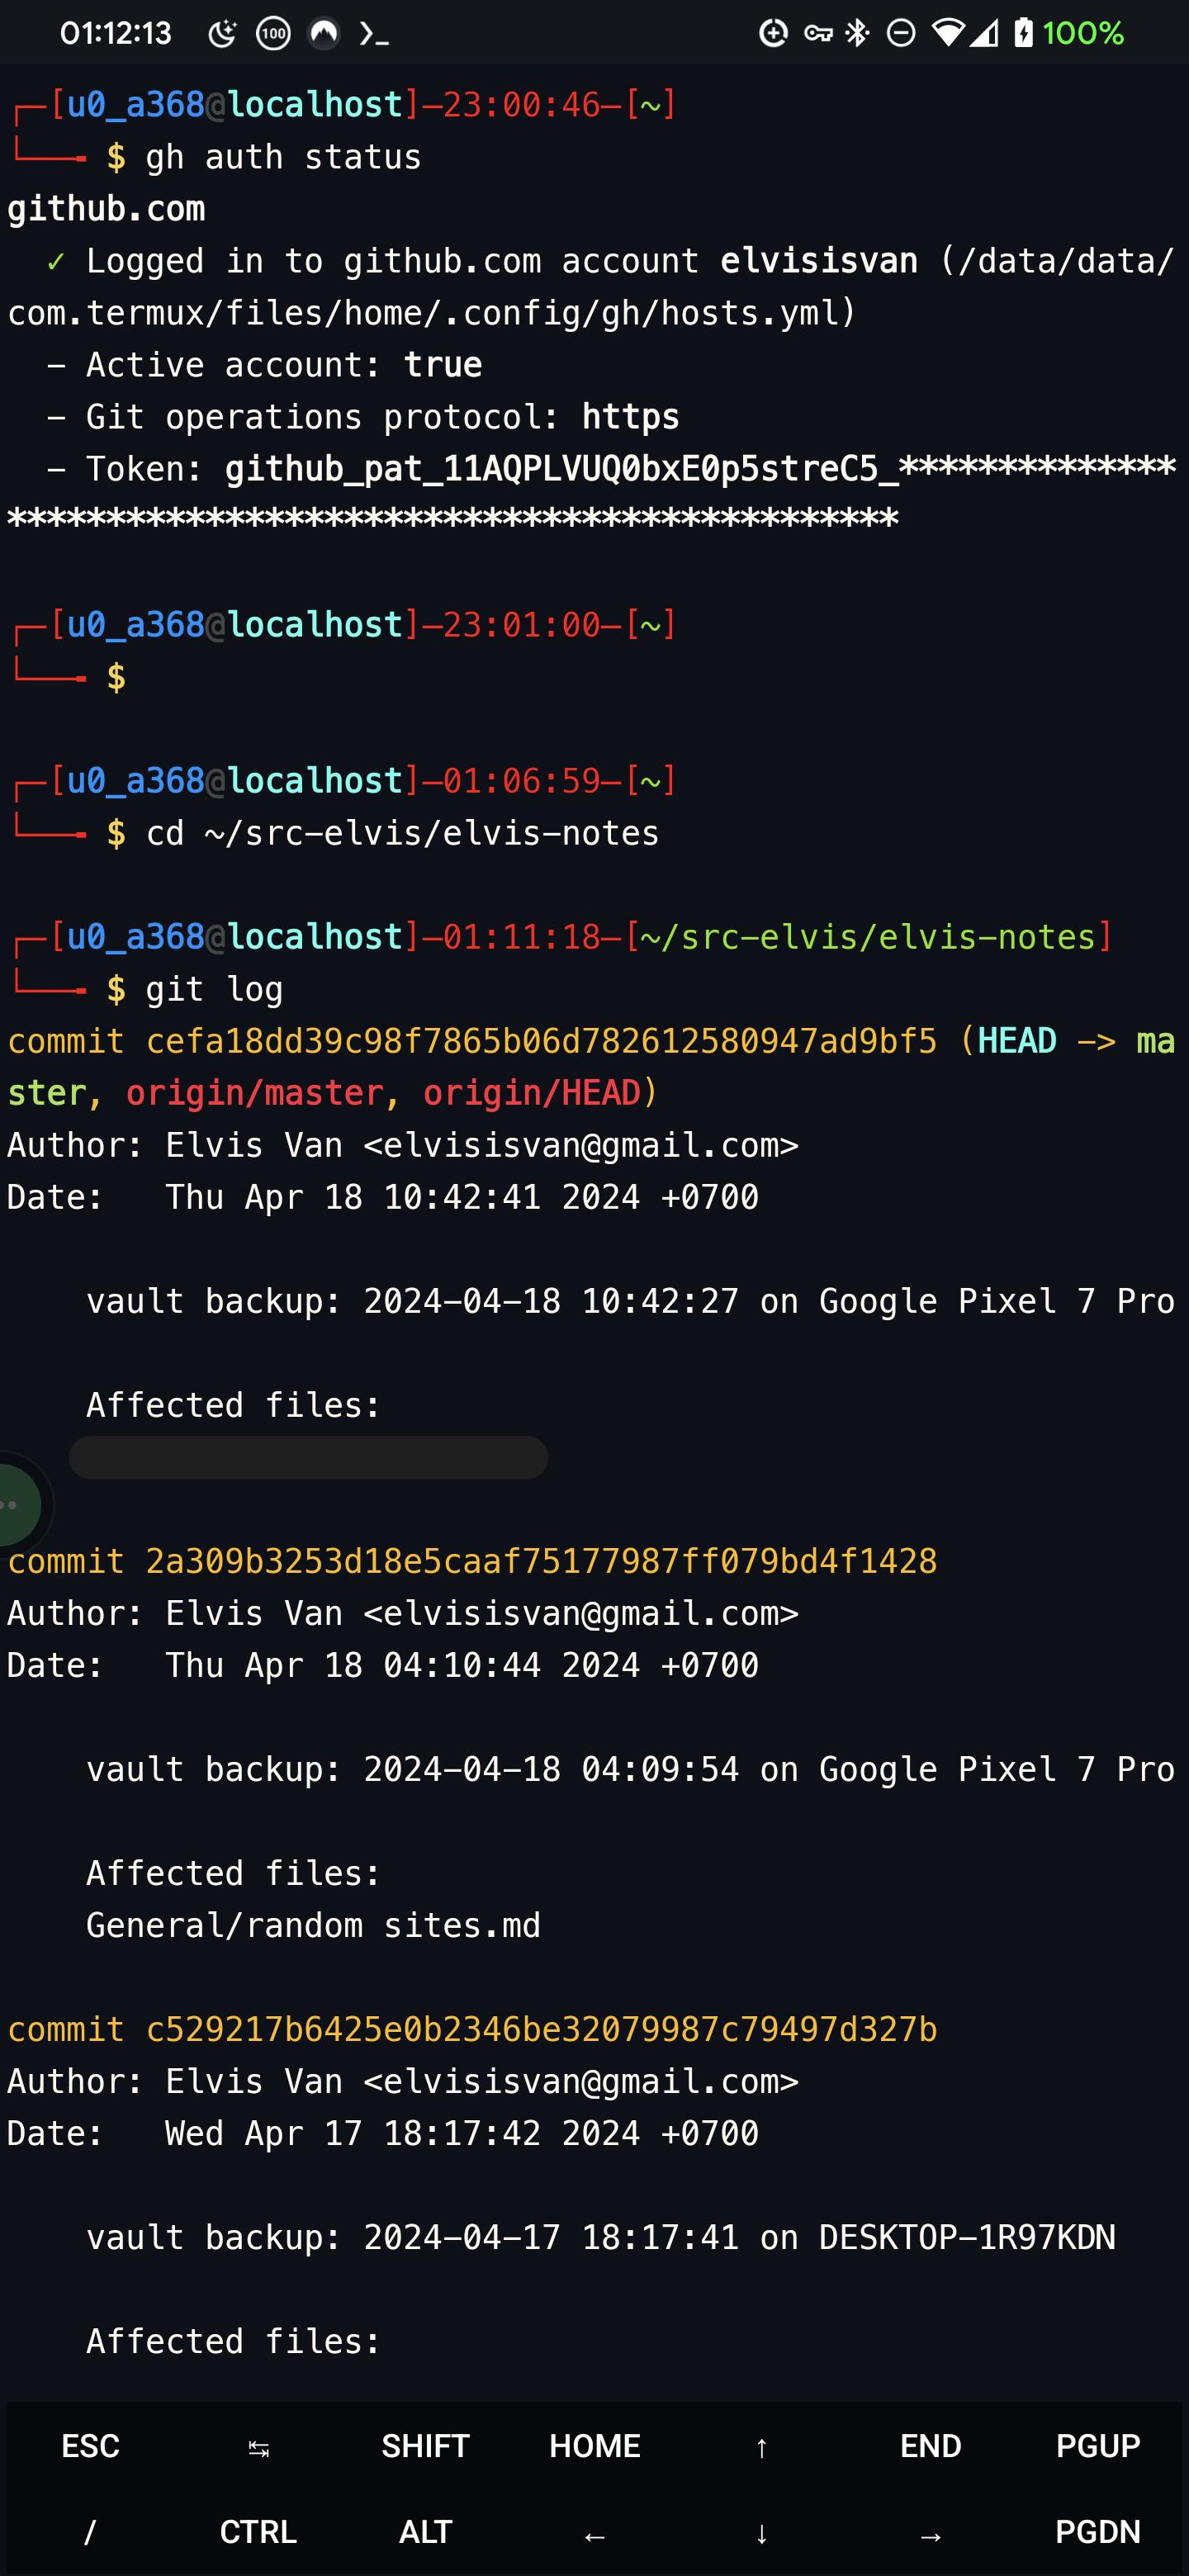
to view git commit history in concise format with only commit titles:
git log -a --oneline

the command gitloga1line is just an alias i set in .bashrc in short for the actually command
Glossary
version control: a tracking system to log details of every changes made to the contents being tracked.
repo: short for "repository", basically a folder containing files but resides on a web server (like Github) instead of local storage.
git: British slang, an unpleasant or despicable person :)
or... a distributed version control system (DVCS) designed to handle software projects with speed and efficiency, created by Linus Torvalds to track the Linux kernel's development.